

This week, as an extended Bank Holiday Bonus, we will be looking at how to outline your novel:
Taking the time to outline your novel can save you grief in the long run. An outline helps keep your story on-track and progressing past the initial thrill of beginning your work. Maybe you can’t wait to start writing, or maybe you’ve already started but are running into problems. This guide will explain all the techniques you’ll need to craft an effective outline for your novel.
***
Essential Components Of Your Story’s Middle
The middle is the longest part of your novel and the most likely to sag. Pacing is the key here, since writers often find it had to keep the middle plot moving. Also take care not to race from one plot point to the next. Splitting the middle into equal sections and outlining each of them will help you control the story’s pace.
Although one of the main purposes of the middle is to build up to the climax, it doesn’t mean nothing can happen before this point. Set your protagonist or other characters obstacles, which ideally also lead directly to the final climax. In this outlining stage it may be useful to work on your ending before the middle. Then you have a clear idea of where the middle needs to go.
Minor characters’ and subplots’ arcs may finish, as well as some major characters’ arcs. This doesn’t mean they disappear from the story, it just allows the questions left hanging to focus on the protagonist and antagonist in the ending.
Midpoint
The midpoint is, as it sounds, in the middle of your novel. It’s a very important stage to shake things up so your story doesn’t get too repetitive. The midpoint involves a Shift in the protagonist’s worldview or goal. Whatever propelled them forward in Plot Point 1 has changed or isn’t enough to keep them going.
“Hamlet is another really good example, because the first half of Hamlet is Hamlet’s journey to prove Claudius’ guilt. Exactly halfway through he proves it, then the second half of the story is ‘What do I do with it?’. And, actually, that’s the shape you find in all archetypal narratives.” – John Yorke
The Shift shouldn’t just come out of nowhere. It should be connected to your overall story premise or core message. At the midpoint, the tension should be raised again. This tension can either be sudden and external, leading to the Shift, or be a result of the Shift by making the situation more personal to the protagonist.
The Black Moment and Plot Point 2
At the end of Act 2, the protagonist should come across the Black Moment. Regardless of all the work they’ve done over this Act, they reach a point where their goal seems impossible. Maybe they discover that their new super skill has a fatal weakness, or perhaps the antagonist unlocks the secret to immortality.
Shortly afterwards is Plot Point 2 where something changes to propel the protagonist onto the final confrontation. Perhaps their skill has reached another level, they’ve realised that even with such a slim chance the stakes are too high, or one of the antagonist’s henchmen switches sides.
This Black Moment and Plot Point 2 are integral to the pace of the plot. With their sense of purpose reignited, the next step is the climax.
***
Essential Components of Your Story’s End
Writers want to leave a lasting impression on your reader through the ending. It’s good to go back and reflect on your core message while doing the conclusion. Characters are particularly important to draw your reader’s interest and emotions. Keep your characters active until the final moment.
“The hero must be the catalyst. A passerby in the street can do something ‘enlightening’ but that’s all that moment must be. The protagonist will be the one to use that clue to enable meaning in the development of the story.” – Rebecca Berto
Climax
The climax is the final confrontation between the protagonist and antagonist where the stakes are higher than they’ve ever been before, and the inner and outer conflicts come to a head. It isn’t a simple stand-alone point in your plot. The climax needs to be supported in its lead-up and its resolution.
Sometimes the climax has its own mini Black Moment. The protagonist’s initial plan is failing and they are forced to come up with a new plan under pressure, usually something more risky than they would typically consider.
Final Chapter
Act 3 ends showing the result of the protagonist’s decision at the climax. It’s good to have a scene or two afterwards to give your reader a “breather” from all the tension. Along with this, any loose ends or unanswered questions should be resolved. Novel endings are important, so you want to be sure it’s planned carefully.
***
Reassess and Reorder Your Scenes
With the details of the chapter breakdown, you novel is really starting to take shape. As a final task, consider checking for scenes which require reordering and tweaking. This may involve moving scenes chronologically so plot point B becomes plot point A, or plot point B stays as it is, but plot point A appears after as a flashback.
Perhaps the timing of a revelation isn’t ideal. When outlining you want to get your ideas down as and when they come to you. But now is the time to go back and check if, for the sake of mystery, a scene is better at that point in the plot or at another point. Make sure that the tension is kept and the big reveal appears at the best possible moment.
“Writing in scenes is great because anyone who’s ever published a book knows how often scenes get moved around in the redrafting and editing phase of a book.” – Natasha Lester
Reordering scenes is often done after you’ve finished writing, but it doesn’t hurt to do a mini-version of that edit now. To help identify the best order of scenes, check your plot’s tension by drawing a graph and consult your core message. If you’re uncertain, leave the scene where it is. You can always move things around later.
Outlining your novel is important to keep your writing on-track. While you should keep it handy as you write, you’re not limited by it. Feel free to change things around as you write. Be sure to keep control of tension and keep focused on your core. Now you’re all-set to get writing!
***
If you are enjoying this post and finding it useful, then don’t forget to check back tomorrow for the final instalment…
You can find the previous parts here:
Tag Archives: Writing Tips
How To Outline Your Novel | Part Four

This week, as an extended Bank Holiday Bonus, we will be looking at how to outline your novel:
Taking the time to outline your novel can save you grief in the long run. An outline helps keep your story on-track and progressing past the initial thrill of beginning your work. Maybe you can’t wait to start writing, or maybe you’ve already started but are running into problems. This guide will explain all the techniques you’ll need to craft an effective outline for your novel.
***
Segment Your Outline Into Chapters
The timeline has given you a basic outline, but it needs to be more concrete and detailed. The story can be broken down into sections of four or five parts, or individual chapters or scenes.
This helps flesh out your novel and define roughly how many words or pages to allow for a certain plot point, subplot or character introduction. Otherwise your beginning might accidentally end up longer than the middle!
It’s useful to plan a few goals to achieve in each chapter or segment. These goals may be:
- Character-orientated: “reveal Character B’s low self-confidence”, “introduce character C and their personality”, “show that characters C and D have known each other for years”
- Plot-orientated: “find murder weapon”, “discover object hidden in ancient ruins”
- Setting-orientated: “make the marshes seem scary”, “reveal the clock tower’s history”
The goals may seem obvious, but having them clearly defined and written down can help focus you when writing that section.
“Working with story structure is not about ‘getting it right’. It is about making your story as clear and specific as it can be. Focusing on your characters’ desire or goal will lead you directly to the dilemma at the heart of your story.” – Alan Watt
One of the most common structures is the Three-Act Structure. While it’s not the only way a novel can be arranged, there are important aspects to include in the Beginning, Middle and End section.
***
Essential Components of Your Story’s Beginning
The first few chapters or so have a vital role to play, regardless of when in your story’s timeline the novel starts. The purpose of the beginning includes introducing and establishing character, setting and plot.
Character
From the beginning, the protagonist and antagonist must be introduced and clearly identifiable, even if the details of the latter are hazy. The protagonist needs to own what is, essentially, their story. You want to introduce a proactive protagonist and make the reader care about them.
It’s best to introduce all major characters. If your protagonist has to travel for a while before meeting a certain major character, introduce them with a short scene from their perspective, or through rumours that the protagonist hears.
Setting
Before getting into the juicy Act 2, your reader needs to be grounded in your world. Show your reader where and when your story is set, including indications of the socioeconomic status of the location and characters.
You also need to establish the rules of your fictional world, even if that just means establishing that they are the same rules as on Earth-as-we-know-it. This doesn’t mean all of your settings secrets should be revealed at the start. Keep setting details rich but controlled.
Plot
In the early chapters, give your reader an indication of what life is like for the protagonist before the catalyst that propels them onwards. Typically, life is either peaceful or lacking something.
“Life before” doesn’t mean back story. This should be revealed more slowly, if at all. The protagonist may meet their first obstacle, which in itself can help reveal the protagonist’s “life before”.
Act 1 ends when the protagonist decides (willingly or not) to pursue the main goal of the story, known as Plot Point 1. It’s possible at this stage that the protagonist and reader don’t know the full, final goal, such as Frodo agreeing to take the ring to Rivendale, but ends up going all the way to Mordor. Either way, the journey of the main plot needs to be clearly introduced. You may also choose to introduce, imply or foreshadow one or two subplots.
First Chapter
Unless you have a prologue, the first chapter is a reader’s introduction to everything. A novel can start anywhere – even at the end of the story! Because of this, it’s often best to finish your outline before choosing when to start.
There are a range of key aspects to weave together for your opening. At this year’s Digital Writer’s Festival, Euan Mitchell had this advice for first chapters:
“For me, I’d come… with the protagonist straight up. There’s three trialled and tested techniques that authors use. There’s: show them in a situation of suffering or pain, show them with a sense of humour, or show them as a part of a family. There are others, but those are the three main ones.”
Key aspects to include:
- Introduce protagonist (including a couple of defining physical features)
- Show protagonist goal / an obstacle / both
- Establish setting (but don’t overdo details)
- Define the genre, voice, mood and tone
- Incorporate core message / main themes
- Don’t overload with new characters
- Don’t fill with back story
Advised aspects to include:
- Introduce main antagonist or idea of antagonist
- Treat as a mini story arc
- Have the protagonist make an important decision
- Start the main plot’s action / journey
To pick out more great ideas for the first chapter, grab a dozen books and read their first chapters. Check what is revealed, what is focused on and what is absent. Then do a more focused study with half a dozen or so books with a similar style or genre to your story.
***
If you are enjoying this post and finding it useful, then don’t forget to check back tomorrow for the next instalment…
You can find the previous parts here:
Via: http://writersedit.com/how-to-outline-your-novel-11-easy-steps/
How To Outline Your Novel | Part Three

This week, as an extended Bank Holiday Bonus, we will be looking at how to outline your novel:
Taking the time to outline your novel can save you grief in the long run. An outline helps keep your story on-track and progressing past the initial thrill of beginning your work. Maybe you can’t wait to start writing, or maybe you’ve already started but are running into problems. This guide will explain all the techniques you’ll need to craft an effective outline for your novel.
***
Assess Your Plot-in-Progress
While your outline is still in its rough, overview state, it’s good to check that the plot is working. To make sure the plot flows, check for gaps both chronologically and dramatically.
A chronological gap occurs when an underdeveloped story jumps over a period of time. It can be disconcerting for the reader if your character is sweating it out in the middle of summer, and then, in what seems a few days, is at home trying to get closer to the fireplace.
Reassess your plot and check for unaccounted days, months, weeks or years. The significance of missing time is relative. If your story spans a period of a year or more, a few days or weeks won’t matter so much.
To fill the gap, you could think of an event to develop a character or a mini obstacle for your protagonist to overcome. Of course, you always have the option to tell your reader that a few uneventful weeks or a busy month passed with no plot progression. Doing this too often can be distracting, but at the same time you don’t want pages of nothing happening.
“References to time and day (or month or season or year) are necessary to keep readers linked with story events and hold them deep inside the fiction” – Beth Hill
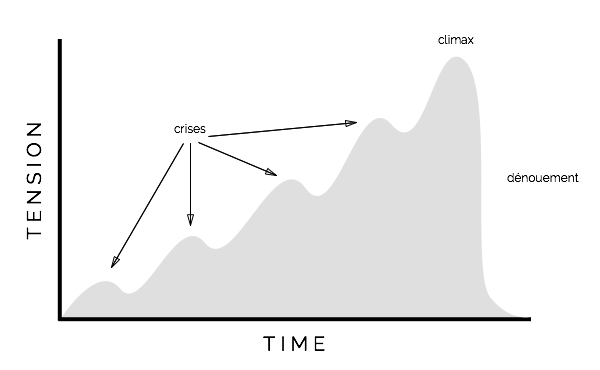
A dramatic gap occurs when the tension of your novel declines when it shouldn’t. The best way to identify these gaps is to draw the story arc as a graph line. Use different colours for subplots to check that the main plot isn’t being overshadowed.
You may encounter lulls in tension shortly after an obstacle is defeated. This is where dramatic lulls are okay as long as they don’t last too long. Overall, the main plot should be increasing in tension as it heads towards the climax.
If you’ve decided to use 1st person perspective, or are considering it, draw the arc from both a generalised view and then from the 1st person narrator’s perspective. From here you can see whether the delay or lack of knowledge from the narrator’s perspective creates a better dramatic arc. To fill dramatic gaps, build more plot points in strategic places and work on increasing tension.
If it seems that your story isn’t working, trust your instincts. Readers can tell when something is a bit off and, as a writer, you’re a reader too. Be honest if something isn’t working – it’s easier to fix now than later.
If you can’t identify the root of the problem, take a break or ask some trusted writing buddies to look over it. Also research the genre’s conventions. If you’re writing genre fiction, look into a tried and tested outline such as the hero’s journey or the eight-point arc.
***
Identify the Core Message (Theme)
Novels have a core message, whether it’s clear or not. You could successfully write your novel none the wiser of its deeper meanings. Yet, by knowing the core, you can write a stronger novel.
Identifying your core helps when you need to decide between two possibilities, and keeps the novel feeling as one whole piece of work.
“Novelists, just like filmmakers, need to truly understand the story they are trying to tell and what impact or take-home feeling or message they want to leave with their readers” – C. S. Lakin
Your core message and themes emerge naturally with your story and can be a phrase, a word or a question. You’ll instinctively know when you’ve hit on your novel’s core or when you’re getting close to it. Here are a few ways to help identify your core message if you don’t already know it:
- Identify 1 – 4 central or important themes
- Look at your protagonist’s goal / desire or main obstacle
- Sum up your story in one sentence (i.e. “pitch”) keeping note of the above two points
- Make a list of published novels you think are similar. Can you identify their core messages?
- Share your story premise with others
Once you’ve identified your core, it’s helpful to go back and tweak plot points or characters to align with this. Be careful to not undermine your story by making the core too obvious or preachy.
Consider if there is a motif or style that is appropriate for your core. There’s a chance that you may not like the core message you identify. At this point you have the option to run with what the story says, or rework the aspects of your story that portray the undesired core message.
***
If you are enjoying this post and finding it useful, then don’t forget to check back tomorrow for the next instalment…
You can find the previous parts here:
Via: http://writersedit.com/how-to-outline-your-novel-11-easy-steps/
How To Outline Your Novel | Part Two

This week, as an extended Bank Holiday Bonus, we will be looking at how to outline your novel:
Taking the time to outline your novel can save you grief in the long run. An outline helps keep your story on-track and progressing past the initial thrill of beginning your work. Maybe you can’t wait to start writing, or maybe you’ve already started but are running into problems. This guide will explain all the techniques you’ll need to craft an effective outline for your novel.
***
Establish Your Settings
Setting is vital to every story. It helps a reader fall into your fiction world, even if your story is set in Earth-as-we-know-it. It can also be critical to the plot: imagine if Grandma’s house wasn’t deep in the woods. Little Red Riding Hood may never have met the Wolf.
The setting also tells the reader about your characters. If Little Red lived in a castle, she may have been more aware of dangerous people, and the Wolf’s motives may have been more than hunger.
Setting can become vague in writing when the writer doesn’t know their setting well. The same way you have character profiles, settings need profiles too. The process of planning your setting is slightly different if your story is set in a real place, though it follows the same general steps.
Before you get to know your setting, you need to choose your setting. If you’re stumped for ideas, the best place to look is in your plot. Setting is tightly linked to plot, primarily affecting what is possible. Does a character need to be or feel trapped? Go for a fort, boarding school, or a safe house in the middle of nowhere.
Usually your story will take place in more than one setting, so go through your plot and make note of the best setting for each scene.
When you start working on details of your setting, you may already have an idea in your mind – Victorian mansion, sea cliffs, military base, Sydney Opera House. Even if you feel familiar with the setting, go around with a camera or search images online.
Make note of what aspects you notice first: is the colour gaudy, do the edges look harsh, are there hundreds of trees? To mix elements of more than one setting, you can put the images in a document and make notes such as “this roof, but that balcony and a bluer colour”. Create a collage or bring out the sketchbook.
“Tear images out of home magazines or catalogs and put them on your vision board. You can also draw floorplans, which can help when you’re trying to navigate your character” – Charlotte Dixon
As mentioned by Charlotte Dixon, maps and floor plans are also a handy tool. If a character spends a lot of time in a building, you need to know the layout so they don’t come from the kitchen into the dining room one time and from the ballroom another.
Likewise, if they travel a lot or go outside to a certain place frequently, maps will help keep you orientated. Draw the street of your character’s favourite coffee shop; what will they see as they sip on their routine morning hot beverage?
Maps and floorplans can be drawn by hand on plain, lined or grid paper, or done in excel by changing the cell sizes to square. Grid is particularly useful for smaller buildings. It may not matter if your castle is 100 or 110 metres long, but there’s a big difference if a house is 10 or 20 metres.
For smaller buildings, also make sure that it is reasonable to fit all the furniture you describe in a single room. If you want to go the extra mile, there are also free 3D modelling programs such as Sketch Up, but generally simple 2D maps are enough.
You may also want to create a setting arc if it undergoes a serious change in the story. This would likely be either physical damage or a change in emotion or meaning. For the former, make notes of what is damaged, how it is damaged and the differences (such as being able to see through a hole in a wall).
Conversely, perhaps a damaged place was fixed or renovated. If the emotions connected to a place change, pick out the details. A sagging roof that once may have seemed a sign of degradation could simply add character.
***
Choose the Shape and Style of Narration
There are three narration shapes your plot can take: linear, non-linear and circular.
Linear narration is when the novel progresses in the typical chronological order. For example, Little Red leaves her house, meets the Wolf in the forest and then again in Grandma’s house.
Non-linear narration shakes things up a bit. In the case of Little Red Riding Hood, for example, Little Red meets the Wolf at Grandma’s, recalls meeting him earlier, is saved by the woodsman, recalls her mum telling her to be careful, and so on, backwards and forwards. Two well-known non-linear novels to have a look at are Catch-22 by Joseph Heller and The Time Traveler’s Wife by Audrey Niffenegger.
Circular narration starts and ends with the characters in the same place. This “place” can refer to a number of things such as a geographical location, an emotional or mental state, or a hierarchical position.
Whatever “place” means for the beginning and end, it should also be important in the middle. The novel The Chrysalids by John Wyndham starts with telepathic mutants being shunned by normal society. They attempt to create a safe place for themselves. However, when they find a whole town of telepaths, they’re looked down on again because of the weakness of their mutation.
If your novel is to be in a nonlinear or circular shape, it’s best to first craft your outline in a linear form. This makes it easier for you as the author to keep track of the story and helps prevent the plot from becoming confused and lost within itself.
“If you’re timebending or rewinding or flashbacking or Groundhog-daying or getting surreal or showing a series of vignettes that add up to a whole or chopping around like the film Memento, you the writer need to know what the simple order is” – Roz Morris
***
If you are enjoying this post and finding it useful, then don’t forget to check back tomorrow for the next instalment…
You can find the previous part here:
Via: http://writersedit.com/how-to-outline-your-novel-11-easy-steps/
How To Outline Your Novel | Part One

This week, as an extended Bank Holiday Bonus, we will be looking at how to outline your novel:
Taking the time to outline your novel can save you grief in the long run. An outline helps keep your story on-track and progressing past the initial thrill of beginning your work. Maybe you can’t wait to start writing, or maybe you’ve already started but are running into problems. This guide will explain all the techniques you’ll need to craft an effective outline for your novel.
***
Constructing a Timeline
The first step is to create a timeline or plot skeleton with your plot ideas. Be sure to include back story elements, both before the novel’s events and at the point they are revealed to the reader. Don’t worry if you have little to start with, it’ll quickly build up. Make sure to leave space for more details.
There are many ways to construct your story outline. Try a few techniques and see what works for you. You could start by writing out key events, or by writing a short paragraph for each narrative arc within your novel. Either way, you’ll eventually need to look at your novel as a compilation of separate events and as a whole.
If you’re stuck with what to do in the middle, or even at the beginning, try starting with what you want to happen at the end and then reverse engineer a path to reach that result. I call this method ‘The Stephen King” because he famously writes that he begins a new novel by writing the last scene, and then works backwards.
This works within minor plot points as well. For instance, if you know you want character B to disappear and the other characters to end up in a boat before moving onto the next scene, brainstorm with that ending in mind.
Depending on your story and how you like to work, the timeline could take on several forms. A dot-point list, an actual timeline or a mind-map are the most common, though there are other forms you can use. Often in the planning stage, it’s easier to use pen and paper so you can draw arrows and cross things out. This leaves a reminder of what you’ve tried and what hasn’t worked.
Technique: Write a List
If your story is relatively simple and short, the list-form is often the best way to start your outline. Focus on the core points of the story and jot down any additional ideas as you go. If you were writing “Little Red Riding Hood”, your list-form timeline may look something like this:
- Grandma makes a red coat for her granddaughter
– The granddaughter is called Little Red because she always wears red- Little Red goes to visit Grandma, who’s sick (novel opening)
– Her mum asked Little Red to deliver food (or medicine?)- On the way, she meets Wolf and tells him what she’s doing
– Wolf runs ahead, eats Grandma and disguises himself as her- Little Red is distracted by flowers along the way
– Wolf wears Grandma’s nightcap and glasses, then hides the rest of himself under the covers- Little Red arrives, but notices that Grandma looks different
– Wolf imitates Grandma’s voice- Little Red notices unusually big: ears, eyes, teeth
- The Wolf reveals himself, Little Red screams and a nearby woodsman runs to her aid and kills Wolf
Currently, this is a basic outline and needs a lot more work if it wants to be novel-length. Writing prompts can often help you flesh out your story. Use your imagination and check out Part Four (coming on Thursday) for notes on characters, setting and plot.
Technique: Map the Events on a Line
For stories that span several weeks, months or years, time becomes a big consideration when placing events. Simply writing the same points you’d write on a list along a line can help create a realistic sense of time.
When deciding the duration between events, remember realistic limitations of time. For example, there is time lost when travelling, and there are only so many meals a person can eat or disasters a person can prevent realistically in one day. Many other factors change with time, such as characters’ ages and the seasons.
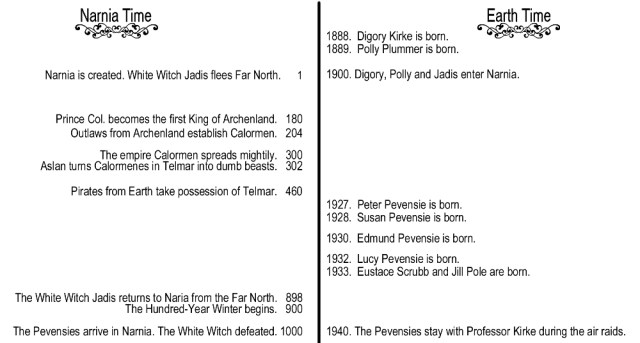
Line-form can also help when comparing two separate time streams, such as in The Lion, The Witch and The Wardrobe.
Lines are more difficult to edit than lists, but a good trick to keep your line flexible is to use index cards or sticky notes that can be easily shuffled and switched around – This is a personal favourite trick of author Julie Cohen (to whom I refer as “The PostIt Queen”). If you are limited for space, Scrivener and Aeon Timeline are two programs popular with writers for this and other purposes.
Technique: Master the Mind-Map
Mind-maps work well for stories that start with a single point and then diverge into several threads, often alternating between characters. Alternately, the story could be several threads converging to one point, like the musical Into The Woods.
To depict the passage of time in a mind-map and be able to easily compare one thread’s time state with another’s, put the point of convergence at the centre, and then draw circles going out. Just like tree rings, each circle you draw can represent another segment of time. When you expand your mind-map, the points in each thread can be placed in its ring-like time “zone”.
***
Explore Your Character Arcs
Character profiles are useful in the initial planning stage. However, when outlining your novel, you need to go beyond this static document. Character arcs show the change or growth a character goes through, and the stages required to get there. The changes could be greater or smaller self-esteem, mastering that ninja technique or realising that money doesn’t solve all your problems.
“Change, transformation, is a constant in our lives and if you can impel some kind of emotional change within your character, it creates an arc of behaviours and adds another dimension to who he or she is” – Syd Field, The Screenwriter’s Workbook
First, determine exactly what part of the story is reflected by the character profile. Often this is the start of the novel. Make a list of any changes you want the character to go through, or changes they need to go through to achieve their profile. Then, check the plot and make another list of possible changes that story events could cause in your character, making note of which changes you want.
If the two lists are contradictory, you may need to reassess your character or plot, or be prepared to work hard and write a character that is believably contradictory. From here, you can continue with the list form, or use a line, mind-map or paragraph to detail out your character arc.
For characters that go through significant change, or for stories that look closely at the human psyche, you may want to do several mini-character profiles. Consider dropping aspects that won’t change, such as physical appearance, unless your character becomes severely ill or can shape-shift.
Another way to use character arcs is to compare them to each other. Firstly, make sure all your characters don’t share the same arc, unless you’re purposefully trying to make a point. If a few characters have similar arcs, try to use one as a comment or opposite reflection on the other, or demonstrate the difference a decision can make.
Also check if any character arcs can assist or become an obstacle for another character’s arc. This can add a new depth to characters’ relationships, and maybe spark off a subplot.
Character arcs can then be used to flesh out your plot. Once you’ve done the arc, make sure the plot supports every small change the character undergoes. If it doesn’t, use this guide to inspire several new plot points.
***
If you are enjoying this post and finding it useful, then don’t forget to check back tomorrow for the next instalment…
Via: http://writersedit.com/how-to-outline-your-novel-11-easy-steps/
Literary Devices: How To Master Flashback

This week Writer’s Blog will be exploring literary devices to help you along with your writing. Literary devices are techniques and structures writers employ to convey their message and story. When done well, the use of literary devices can alter, manipulate and challenge the way a reader perceives any work. Used masterfully, literary devices influence how a story or essay can be interpreted and analysed, as well as how much the reader enjoys the work. Today’s device is Flashback:
How To Master Flashback
A flashback involves (as the name describes) a scene that moves from the present to the past to reveal something about a character or event within the narrative. Generally in fiction, the use of a flashback constitutes using white space to separate the past from the present, to signal to the reader that there has been a change in time and/or place. In some cases, a writer may choose to use italics (usually if the scene is more of a memory snippet than an actual fully-developed scene, as lots of italicized text irritates some readers and editors).
The best flashbacks are set up by the previous paragraph. In the lead up to the flashback, there is generally a ‘trigger’ – something that causes the protagonist/narrator to recall a particular event or detail of the past. The trigger is explored/explained in the flashback itself which then also reveals new information to the reader.
Flashbacks are an opportunity for the author to provide insight into situations that would otherwise be left unexplained…
Used in short stories, poems, novels, plays and movies, it is one of the most common and most recognisable writing techniques, and when executed well, one of the most effective.
Examples:
- The Road (film): The director has used flashbacks throughout the whole film to reveal to the viewer how in a post-apocalyptic world, a father and son came to be on the road, homeless and unprotected.
- Breaking Bad (television series): This series is renowned for doing things differently, and the use of flashback here is no exception. In Breaking Bad, the flashbacks often come first and are then later explained and explored in the next few episodes, setting up a sense of intrigue within its viewers.
- Harry Potter (book series): Yes, even the Harry Potter novels use flashback. Remember the Pensieve that Dumbledore uses? The reader (and Harry) are transported back in time to relive the memories of Dumbledore and others.
***
Tips for Using Flashbacks:
- Use a trigger to justify taking the reader back into the past. This is the most natural way to introduce scenes from the past as this is actually how we recall memories in real life – we see something that reminds us of an event, person or detail that occurred in the past.
- Also ensure that you use another trigger or event to bring your character (and reader) back to the present. This gives your reader clear signals as to when you are changing from past to present and present to past, in order to keep them immersed in the story, but not disorientated and confused.
- Think of these triggers as ‘bookends’ to your flashback – they need to be there to keep this scene neat and tidy, but also shouldn’t stand out like a sore thumb (excuse the cliche).
- Don’t overdo it. Don’t litter your narrative with multiple flashbacks, this becomes irritating and confusing for the reader, but also questions the validity of you setting your story in the present when more is actually happening in the past… If you find you are doing this often, you might want to have a think about changing when you set your story.
- Ensure that each flashback contributes to your story in someway or another, whether it reveals something about a particular event, builds upon your characterization of the protagonist or sets up something for further down the track in the narrative – it has to propel the story forward, even though you’re looking back.
For some fantastic tips for writing successful flashbacks, check out this article at Writer’s Digest.
Literary Devices: How To Master Dialogue

This week Writer’s Blog will be exploring literary devices to help you along with your writing. Literary devices are techniques and structures writers employ to convey their message and story. When done well, the use of literary devices can alter, manipulate and challenge the way a reader perceives any work. Used masterfully, literary devices influence how a story or essay can be interpreted and analysed, as well as how much the reader enjoys the work. Today’s device is Dialogue:
How To Master Dialogue
What is dialogue?
“Dialogue is not just quotation. It is grimaces, pauses, adjustments of blouse buttons, doodles on a napkin, and crossings of legs.” – Jerome Stern, Making Shapely Fiction
Not all of the following are used together, however, dialogue consists of four main elements:
- Spoken words – the direct speech or the words within the quote marks.
- Speech tags – the words that tell the reader who is speaking and how they are speaking.
- Actions of the speaker – a description of the speaking character’s actions before, during and after speech.
- Thoughts or emotional state of the speaker – a description of the speaking character’s emotional state before, during and after speech.
When characters start talking to each other, the story comes to life. A reader can gain a far deeper understanding of a character through their words and actions than they can from the narrative text. A couple of sentences of dialogue can reveal much about the background of a particular character. Are they wealthy or poor? What is their country of origin? Have they been well-educated? Are they feeling happy or sad? All of these questions can be answered with effective dialogue.
***
What should dialogue do?
- Reveal emotions
- Draw the reader into the characters’ lives
- Show the reader how the character reacts to different situations, such as pressure, intimacy, hate, love or fear
- Move the story forward – every piece of dialogue should have a purpose
- Hint at or tell of coming events
- Give balance to a story after a long section of narrative
- Increase the pace of the story
- Contribute humour
- Reflect the changes in emotions and lifestyle of your characters
What should dialogue not do?
- Summarise action that could otherwise be exciting
- Force-feed information to the reader – tell a character something they would already know, purely to fill in background to the reader
- Act as padding to achieve a word count
- Ramble on without the characters learning anything knew or achieving something
- Sound exactly like real speech, with interruptions, rambling, repetitions and stutters, although these have their place
***
Tips for Writing Dialogue
Remember, most people speak quite simply. If you dress up a character’s speech too much it will sound unrealistic.
“If you are using dialogue, say it aloud as you write it. Only then will it have the sound of speech.” – John Steinbeck
Better yet, grab a few friends and act it out, taking note of the speech tags and the actions of the speaker. This can be very entertaining and you’ll be able to see very quickly where your dialogue falls down.
Now over to you.
Literary Devices: How To Master Prologue
This week Writer’s Blog will be exploring literary devices to help you along with your writing. Literary devices are techniques and structures writers employ to convey their message and story. When done well, the use of literary devices can alter, manipulate and challenge the way a reader perceives any work. Used masterfully, literary devices influence how a story or essay can be interpreted and analysed, as well as how much the reader enjoys the work. Today’s device is Prologue:
How To Master Prologue
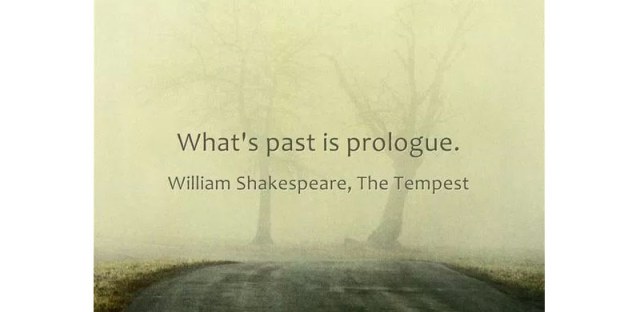
“What’s past is prologue” – William Shakespeare
This comes from Shakespeare’s play, The Tempest, spoken by the character Antonio who suggests that the events of the past set the stage for the present. The quote is engraved on the National Archives Building in Washington, DC, which houses the most important of the United States’ historical documents. But in a literary work, while the prologue itself precedes the beginning of the story, it can contain events of the past or the future.
What is a prologue?
The prologue serves as an introduction, giving readers important information from the past or the future about the text that follows. It may establish the setting, introduce the characters or indicate a theme or moral in the story. Generally, the prologue is short and will only cover one or two pages. Most prologues are written by the author of the work.
A prologue can foreshadow events and conflict in a way that beginning in the middle of the action can’t. It is used when material that you want to include in the opening is out of time sequence with the rest of the story, giving readers information that is otherwise unobtainable within the normal structure of the novel. A prologue must also be a vital part of the whole text, not just added on before the opening chapter for no reason.
The Redwall Series
Popular children’s author Brian Jacques used both a prologue and an epilogue to frame each story in his Redwall series. Jacques uses the prologue effectively to establish the setting and introduce readers to minor characters with a meaningful story to tell. In these opening scenes, the dialogue between the characters is intended to draw the reader in, as much as it does to the characters who are listening in the story.
The Noon Lady of Towitta
In Patricia Sumerling’s mystery, The Noon Lady of Towitta, the unusually long prologue describes the events leading to the arrival of the police on the farm at Towitta, an isolated town in the Flinders Ranges of South Australia. The prologue is straight-forward and written in third person. The story that follows is told from the first person perspective of Mary Schippan, the lady suspected of murdering her younger sister. Mary Schippan could not have given readers a clear picture of the events preceding the police investigation as she was not present, so the author chooses to employ a prologue. Without it, readers don’t have the necessary background required to understand the story and so obtain it outside of the first person structure of Mary’s narrative.
The Da Vinci Code
In Dan Brown’s The Da Vinci Code, the prologue is employed firstly to establish the plot and setting of the book. Opening at the Louvre Museum in Paris, readers are presented with an event at a specific time and place around which the entire novel is plotted. Jacques Sauniere, the curator of the museum, is shot by a mysterious man and must use his dying breaths to keep his secret alive.
“A collection of the world’s most famous paintings seemed to smile down on him like old friends.” – Dan Brown, The Da Vinci Code
The prologue also establishes a significant theme throughout the novel – the importance of art. As he bleeds to death, Sauniere is surrounded by many famous artworks, one of which, we can assume, is Da Vinci’s Mona Lisa, a painting that plays a critical role in the author’s plot.
***
Writing an effective prologue
The most important feature of a prologue, like any literary device, is that it serves a purpose. Check to see if your prologue is doing a job. Does it establish the setting? Does it introduce characters, or a theme, or a moral? What does it add to the whole work? If it doesn’t have a clear purpose, you don’t need it.
Tip: Read prologues written by your favourite authors
Search for prologues written by the authors on your bookshelf. They’ve been published, so you can assume that the prologue is well written and employed. Look at the length and the style of the writing. The more prologues you read, the better you will understand when and how to use them effectively, if at all.
Tip: Practice writing first lines
Essentially, if you’re using a prologue, you are starting your book twice so you’ll need two great opening lines. It can be useful to practise writing clever opening lines, enticing the reader to continue. If you’re already working on something, ask yourself if the first line is the best it can be. Shuffle the words around. Try a selection of synonyms. Work with it and keep practising.
Tip: Write a prologue for a book that doesn’t have one
Choose a novel without a prologue and consider how one could be used. Try to find something in the text to link with your prologue – a theme, the setting, or even some additional background information. Be creative! You could give a character a secret that affects how they respond to events in the story. Don’t feel discouraged if you find that your new prologue doesn’t work – this just means that you are improving your ability to detect ineffective use of the device.
Literary Devices: How To Master Alternate Point of View

This week Writer’s Blog will be exploring literary devices to help you along with your writing. Literary devices are techniques and structures writers employ to convey their message and story. When done well, the use of literary devices can alter, manipulate and challenge the way a reader perceives any work. Used masterfully, literary devices influence how a story or essay can be interpreted and analysed, as well as how much the reader enjoys the work. Today’s device is Alternate Points of View:
How To Master Alternate Point of View
Alternate Point of View (POV) is a complicated narration form, but, if done the right way, it can make for a captivating read.
This technique combines the depth of a single character’s perspective with the versatility of switching between characters. You can alternate between two characters, or several – but the more you use, the more work you will need to do.
This narration form is paired with either first person POV or limited third person POV. Most commonly, first person alternate POV switches between two characters, but there is nothing stopping you adding more if you can handle it.
You may have heard alternate POV referred to as switching POV, dual POV or multiple POV. ‘POV’ is also sometimes interchanged with ‘perspective’.
Let’s dive into what it all means and how you can use this technique…
When should I use alternate POV narration?
A good way of deciding when to use alternate POV is this: if the story doesn’t need it, stick to single perspective.
Alternate POV is still uncommon enough to distract your reader a little, and some find it frustrating. To avoid this, you want to make sure your story really needs it, and that you do it really well.
This form of narration is all about contrast. The contrast could be in personality, culture or ideology. Whatever the reason, make sure it’s key to the story. If your narrative doesn’t gain anything from each new perspective, cut it back to just one.
Alternate POV is more common in some genres than others. For example, it’s a popular choice in both YA fiction and romance.
“This method allows readers to enjoy getting to know both the hero and heroine intimately by seeing their relationship through both characters’ thoughts.” Gail Gaymer Martin
It’s important to spend a little time thinking about the market and how you’d pitch your alternate POV story, even in the early stages of writing.
If you’re thinking about alternate POV for its practical use of access to different action or location points, it’s worth doing some serious work on the perspectives to make them really pop. This isn’t a narration form that blends in the background; it stands out. So you may as well make the best of its features.
Switching POV within a series
If you’re writing a series, alternate POV can be useful to change things up and sustain interest throughout multiple books.
It’s okay to shake up your pattern a bit with each book. Some series add a new character’s perspective to the mix in the second or third novel as they become more relevant to the plot. Other authors start a series as single-person perspective, and end it alternating between two or more.
As always, you must keep the story’s best interests in mind.
* * *
How to use alternate POV effectively
As we mentioned above, managing alternate POV can be a complicated task. When writing, there are some important considerations to keep in mind to ensure you’re using this technique as effectively as possible.
Here are a few must-dos:
Develop distinctive character voices
Particularly when using first person POV, you want your characters to have clear, distinct voices. This is probably the most important factor of alternate POV, and is a common criticism of stories using this form.
The same way dialogue is tailored to each character, so should their introspection and description of the outside world.
“What’s the point of telling a story from multiple perspectives if the voices aren’t different?”- S. E. Sinkhorn
In alternate POV, character voices drive the story. Make sure your characters don’t just have strong voices, but memorable ones. Giving each character a distinctly different perspective is important to add something unique to the story and help the reader identify who they’re following.
Establish a pattern for your changing POVs
Ideally you’ll want to keep to a pattern, such as character A, then B, then A, then B and so on. Breaking out of a pattern will jar the reader. Sometimes, of course, that’s what you want. The end of Allegiant by Veronica Roth does this particularly well.
Even more important than having a pattern is deciding what POV provides the best tension for each particular moment in the story.
If you find that some chapters are just filling space so you can keep up a pattern, you might want to consider no pattern at all. Repeating the same scene in a different character’s perspective is highly unusual and not recommended, so you need to get it right the first time.
“I ask myself, ‘Who has the most to lose in this situation?’ This question usually makes the best POV character obvious.”- Lisa Walker England
It’s all about reader expectations. If your story starts alternating POV in a set pattern, stick to it. But if there is no clear pattern from the start, you’ll have more freedom to choose who each scene is told through.
Outline your story well before writing
The golden tool for working out your story pattern is doing up an outline. Not only do you need to have clear plots, character arcs and climaxes for each perspective, they need to parallel each other.
Looking at the story as a whole, you should see what character perspective pattern works the most naturally with your story – if you need a pattern at all.
Mark POV switches clearly
Always have a cue when you switch character perspectives, such as the start of a chapter, scene or line break.
“The last thing you want is for the reader to be confused about whose head she’s in. So make sure you give clues right away with setting and internal dialogue before you jump in.” – Lisa Gail Green
Don’t switch too often. The minimum length to keep the same perspective is one scene. However, if your scenes are short, and you change with each scene, this can be taxing on the reader.
For stories in first person POV, switches should occur only with chapter breaks, and generally each chapter is titled after the perspective character.
When writing in third person POV, it’s good to use the perspective character’s name as soon as possible after the change.
Whether you’re writing in first or third person, make sure to go straight to the character whenever you make a switch. Scenery description can happen in a couple of sentences. Grounding the reader is your biggest priority.
* * *
Pros Of Using Alternate POV
As with any choice you make with your story, each technique has pros and cons. Here are three big pros to consider when thinking about using alternate POV.
1. It allows flexibility
Alternate POV offers a combination of depth and flexibility that is hard to find in any other form.
The plot is progressing in two or more places at once? Just switch over to the other character. You need someone to push the big red button to advance the plot, but your lead character needs to be struggling with self-doubt? You can still take your readers through the thrill of the moment inside another character’s head.
Having said this, it’s important to stick to your characters. You can’t just bring along character perspectives for the sake of convenience. But having multiple character perspectives allows you to weave a bigger, more complicated and diverse story.
2. It can help create tension
Tension is important in any story, and alternate POV has a couple of handy features that make it a little easier. Complicating a situation is one technique that can increase tension. Having different perspectives, with different opinions and worldviews all looking at the same thing, can really ramp things up.
“You don’t want your readers bored, and this POV lets you shift heads and keep the reader on their toes.” – Mac Hopkins
You’re not in the one character’s head all the time. That means the reader will miss bits. And you, as the author, can deliberately conceal parts of the story or character to be revealed when you want; the tension of revealing information can be brought out whenever it suits.
3. It gives you control over pacing
With alternate POV, you have full control over your story’s pacing. The simple techniques of shortening the space between each switch can increase the pace.
At times you can put different character’s climaxes side-by-side. And other times you can splice quieter moments of one character with a character facing something more intense.
Cons Of Using Alternate POV
As with any choice regarding literary techniques, there are also a number of cons to using alternate POV. Here are three of the main disadvantages and difficulties…
1. A lot more character development is needed
A challenge with alternate POV is the amount of foundational character development you need to get started.
A single POV means you dig deep in one character. A broader POV, such as omniscient, means you can work just with characters’ external mannerisms. But in alternate POV, you need to be an expert on any and all characters you alternate between.
“More POV characters means the reader has less of a connection to any one character. It’s a price that must be paid.” – Glen C. Strathy
In many ways, your characters will make or break your story. Of course, you need to pay close attention to plot and all other literary features. But your reader needs to know your perspective characters, and fall in love with them – all of them. In the same space you would use for a single POV story.
2. It can be hard to keep track of things
Just as complication can add tension, if you can’t harness the spirals of thoughts and plots, it can be a struggle to pull together a cohesive story. Alternate POV will be very difficult for anyone who isn’t used to planning, scheduling and keeping track of everything.
It’s easy to lose focus, which can lead to character voices sounding too similar, characters with incomplete arcs, or unbalanced tension across the perspective characters.
3. There’s a risk of head-hopping
Head-hopping is an easy mistake for new writers when using third person alternate POV. Head-hopping refers to changing the perspective character within a scene. If you’re alternating with chapters, it also includes accidentally changing perspective within a chapter.
“When the narrator switches from one character’s thoughts to another’s too quickly, it jars the reader and breaks the intimacy with the scene’s main character.” – Joe Bunting
Mastering the switch point between perspectives is important; it will help you avoid the mistake of head-hopping when you intentionally want to switch.
You’re less likely to unintentionally slip if you focus well on the perspective character. Having clear, distinct characters will help you stay in one head.
* * *
Examples of Multiple POV
Alternate/multiple POV has been around for a long time, but has become more common over the last several years. Reading is one of the best ways to become familiar with a writing technique or form.
Below is a list of novels with alternate POV for you to start cultivating your reading list with:
- Jodi Piccoult’s My Sister’s Keeper
- Audrey Niffenegger’s The Time Traveler’s Wife
- George RR Martin’s A Song of Ice and Fire series
- Erin Morgenstern’s The Night Circus
- Paula Hawkins’ The Girl on the Train
- Maggie Stiefvater’s Shiver series
- John Green’s & David Levithan’s Will Grayson, Will Grayson
- Gillian Flynn’s Gone Girl
- Jane Hamilton’s A Map of the World
- Sarah J. Maas’ Throne of Glass series
Alternate POV is an advanced and specialised literary device. But if your story calls for it, and you have a flair for character voices and planning, it can really make for a gripping novel.
Via: https://writersedit.com/literary-devices-alternate-point-view
Literary Devices: How To Master Setting

This week Writer’s Blog will be exploring literary devices to help you along with your writing. Literary devices are techniques and structures writers employ to convey their message and story. When done well, the use of literary devices can alter, manipulate and challenge the way a reader perceives any work. Used masterfully, literary devices influence how a story or essay can be interpreted and analysed, as well as how much the reader enjoys the work. Today’s device is Setting:
How To Master Setting
On its most basic level, the setting of your story is simply the location at which your story takes place, like a set to a stage show. This includes the location, the immediate surroundings, the weather and the time. But quite often, the setting is much more than just the ‘where and when’ of your story.
The setting will show much about your characters – their lifestyle, how they respond to recognisable and unfamiliar environments and how they are feeling. The description of an environment familiar to the reader can even direct them to special memories of their own. Rather than simply throwing your characters into an apartment building ‘just because’, consider how that setting will affect your characters and your plot. Think about how the location and time can be symbolic or metaphorical.
Genre
The type of story you are writing will have a significant impact on the way you describe your setting. In a thriller, the author employs dark imagery and metaphor to evoke a feeling of discomfort in the reader.
In a fantasy, the setting is full of mystery, twinkling lights and tree trunks so thick you can’t wrap your arms around them. The characters may stumble upon a misty swamp, escape from a gloomy dungeon or ride on a dragon’s back amongst the orange clouds of an evening sky. The magic is never too far away.
* * *
Research
If your story happens in a real place, be sure to research that place. Many readers love to read about towns and cities where they have lived or places they have visited. It is essential, therefore, that you get your facts straight. If you make up a new building, great, but don’t be too specific about its location. If you go one step further and make up an entirely new place, of course you can do what you like with it but make sure the general geographic details are realistic.
If possible, it helps to spend time in your setting. Absorb the sounds, the sights, the smells and the feelings caused by your environment. Be there at different times of the day. A city street at nine o’clock in the morning on a weekday looks very different on a Saturday night. Check that any flora or fauna you mention can realistically be found in that region of the world. You won’t find a polar bear in the Australian outback (unless your character builds a zoo in Coober Pedy). Also check that your weather patterns are feasible.
* * *
Observation
Observing your environment forms part of your research. You should be on the lookout for ideas whenever you visit a new place. In fact, you should be on the lookout for ideas whenever you visit a familiar place! You might just spot the perfect place for a… [insert action here!]
Many writers, especially those who like to go through rigorous planning stages before starting to write, develop a template on which they write notes about a new setting. These notes can include general impressions at first sight, sensory impressions, climate, style and age of the buildings and even types of transportation. If you do decide to develop such a sheet, you don’t have to fill in every detail for every piece of writing. Or, you might just need to modify your sheet to suit the genre. Nevertheless, the more details you remember, the more realistic your setting will be when you sit down to write. If you’re not into note-taking, newspaper clippings, travel brochures and your own photographs are excellent memory-joggers.
* * *
Escape
Vivid descriptive passages give readers a chance to escape to a totally different world. That is the beauty of reading! You might see the inner-workings of unusual occupations or delve into a dark sanctum with a team of cave divers, facing your own fear of the underground. How does the CEO of a multimillion dollar company survive the rigours of the daily grind? Many authors sprinkle inside information into their settings, details that might otherwise be overlooked by a writer who hasn’t done their research or lacks life experience in the subject on which they are writing.
* * *
Character’s Viewpoint
Try not to spend too many precious words on descriptive passages without showing the setting from your character’s viewpoint. Not only will this keep your readers entertained but they will also understand your character’s mood without telling them directly. If your character wants to be alone, the never-ending line of apple trees in the sun-kissed orchard looks pretty good. But if they’re searching for someone or hiding from a murderer, the apple trees may take on a different, more sinister appearance.
* * *
“As a writer, I’m driven by settings. Others are driven by characters or predicaments, but with me, settings come first” – Jim Lynch
The setting might be the catalyst on which your story is developed. Author Jim Lynch starts writing once he has chosen a ‘where’. But no matter where you choose to start writing, crafting your setting skilfully can take your story to the next level.
